How to Remove Swirl Marks from Your Car
Introduction: Restore Your Car’s Shine and Value
Have you ever noticed that subtle haze or mar on your car’s paint after a routine wash?
Those tiny, circular scratches—known as swirl marks—can dull your vehicle’s finish and lower its overall value. In fact, even minor swirl marks can detract from your car’s appearance and negatively affect its resale price.
Whether caused by improper washing techniques, aggressive drying methods, or contaminated microfiber towels, these imperfections are not only unsightly but can also lead to further damage if left untreated.
This comprehensive guide, How to Remove Swirl Marks from Your Car, is designed to be your ultimate resource for achieving a flawless, mirror-like finish on your vehicle.
We’ll dive deep into what swirl marks are, why they occur, and, most importantly, how to eliminate them using proven, professional methods.
Whether you’re a DIY enthusiast or a seasoned car detailer, you’ll find actionable advice, expert tips, and step-by-step instructions to restore your car’s exterior to its original glory.
In this guide, we cover:
Understanding Swirl Marks: What they are, why they form, and how they affect your car’s paint.
Essential Tools, Products, and Techniques: The best compounds, dual-action polishers, microfiber towels, and detailing pads that make a difference.
Step-by-Step Removal Process: Detailed instructions for every stage—from initial preparation to final protective coatings.
Prevention Strategies: How to maintain your paintwork and avoid swirl marks in the future.
FAQ Section: Answers to common questions about swirl marks, removal methods, and maintenance tips.
By integrating industry-leading insights and professional detailing techniques, this guide will empower you to take control of your car’s appearance. Let’s begin the journey to restoring that showroom shine and preserving your vehicle’s value with expert methods on how to remove swirl marks from your car.
Understanding Swirl Marks

What Are Swirl Marks?
Swirl marks are fine scratches or micro-abrasions that form on your car’s paint surface. They typically appear as a series of faint, circular lines or a subtle hazy effect that can diminish the reflective quality of your finish. These marks are often most noticeable under direct light, especially on dark-colored vehicles.
How Do Swirl Marks Form?
Swirl marks occur when abrasive particles—such as dirt, sand, or even tiny fibers—are rubbed against the paint surface during cleaning. Common causes include:
Improper Washing Techniques: Using dirty or abrasive cloths and sponges can create micro-scratches.
Automated Car Washes: Brush-based car washes may inadvertently cause friction that leaves behind swirl marks.
Drying Methods: Aggressive drying with a towel that isn’t microfiber can cause scratches.
Contaminated Microfiber Towels: Reusing dirty or low-quality towels can transfer grit back onto the surface.
Lack of Lubrication: When washing, insufficient lubrication allows dirt particles to drag across the paint, resulting in scratches.
The Impact on Your Car’s Paint
Swirl marks do more than just affect aesthetics—they can compromise the integrity of your vehicle’s clear coat over time.
Even if they initially appear as minor imperfections, untreated swirl marks can eventually lead to oxidation and more serious paint damage. This deterioration not only makes your car look older and less appealing but may also reduce its resale value.
Understanding the causes and consequences of swirl marks is the first step in developing an effective removal and prevention strategy. With the right techniques and products, you can reverse the damage and keep your car looking its best.
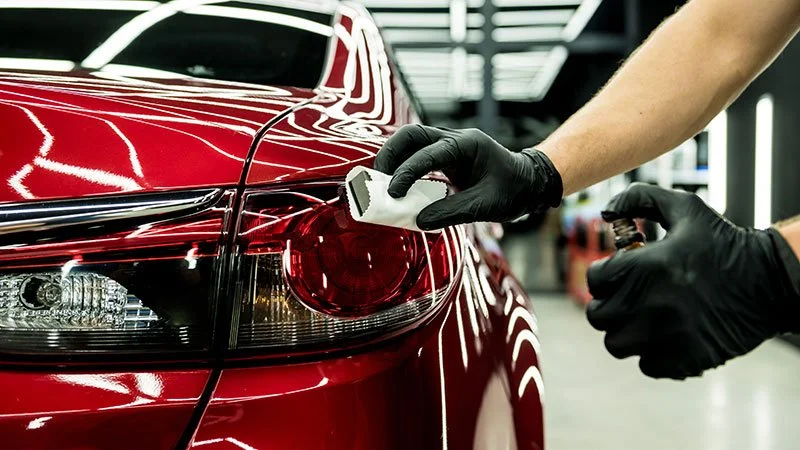
Essential Tools, Products, and Techniques

Achieving professional-grade results when removing swirl marks requires the right tools and products. In this section, we detail the essential items every car detailer should have in their arsenal.
Professional Tools
Dual-Action Polisher
A dual-action (DA) polisher is indispensable for effective swirl mark removal. This machine provides a safe, controlled way to correct paint imperfections without causing additional damage. Look for models with variable speed settings so you can adjust the intensity based on your car’s condition.
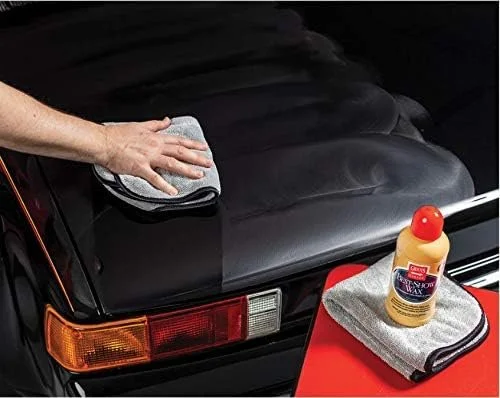
Microfiber Towels
High-quality microfiber towels are crucial for both the application and buffing stages. They’re soft, non-abrasive, and excellent at picking up dust and residue without scratching the surface.
Detailing Pads
Detailing pads, available in foam, microfiber, or wool varieties, play a vital role in applying polishing compounds. Each type offers a different level of aggressiveness—foam pads for initial correction and microfiber pads for finishing work ensure a smooth, uniform shine.
Clay Bar and Lubricant
A clay bar treatment is essential for removing embedded contaminants that standard washing cannot eliminate. Using a lubricant with the clay bar helps to lift dirt particles without scratching the paint.
Premium Products for Swirl Mark Removal
Best Compounds for Swirl Marks
Choosing the right polishing compound is key to effectively removing swirl marks. Look for products specifically formulated for car swirl mark solutions. These compounds work to break down oxidation and eliminate fine scratches without damaging the clear coat.
Sealants and Protective Coatings
After the swirl marks are removed, protecting your car’s paint is essential. Premium waxes and sealants provide a durable layer of protection that not only enhances shine but also safeguards against UV rays, dirt, and moisture.
These products help maintain the pristine condition of your paint and reduce the likelihood of future swirl marks.
Techniques for Optimal Results
Wet Sanding: In some cases, a light wet sanding using progressively finer sandpapers (starting around 200-grit and moving to 3000-grit) may be necessary before polishing. This technique helps remove deeper oxidation and prepares the surface for a flawless finish.
Layered Polishing: Instead of applying a thick layer of compound, opt for multiple thin layers. This approach ensures even coverage and reduces the risk of smearing or uneven correction.
Buffing: After polishing, use a clean microfiber towel to buff the surface. This final step removes any residual compound and enhances the reflective quality of your paint.
Expert Tip: “Investing in high-quality tools like a dual-action polisher and premium detailing pads makes a significant difference in the effectiveness of your swirl mark removal process. Consistent, careful application is the key to achieving a professional finish.”
Step-by-Step Guide to Removing Swirl Marks

Achieving a flawless paint finish requires a systematic approach. Follow these step-by-step instructions for DIY swirl mark removal that yield professional-level results.
Step 1: Preparation
Clean the Surface Thoroughly:
Wash your car using a pH-balanced car wash soap to remove all dirt, grime, and contaminants.
Rinse with clean water and dry completely using high-quality microfiber towels.
Decontaminate the Paint:
Use a clay bar treatment with a dedicated lubricant to remove any embedded particles that regular washing cannot eliminate. This step is crucial to avoid transferring dirt during the polishing process.
Inspect the Surface:
Check the paint for swirl marks, oxidation, and any imperfections. Use a bright light or a headlamp to identify problem areas.
Prepare Your Work Area:
Ensure you are working in a shaded, well-ventilated area. Avoid direct sunlight or extreme temperatures, as these can cause the compounds to dry too quickly.
Step 2: Wet Sanding (If Needed)
Note: This step is only required for vehicles with deep oxidation or pronounced swirl marks.
Select the Right Grit:
Start with a 200-grit sandpaper to remove the most severe imperfections. Keep the surface wet at all times to prevent scratches.
Gradually progress through 400, 600, 800, 1000, 1500, and finally 3000-grit sandpapers to refine the surface.
Sand Evenly:
Work gently and evenly, using a sanding block to maintain consistent pressure. Frequently check your work to ensure you’re not removing too much clear coat.
Rinse and Dry:
After sanding, rinse the area thoroughly and dry with a microfiber towel. The surface should be smooth and free of visible sanding marks before proceeding to polishing.
Step 3: Polishing
Apply the Polishing Compound:
Apply a small amount of a high-quality restoration compound to a microfiber applicator pad. Begin with a compound formulated for removing swirl marks.
Work in small sections, applying the compound in a circular or crosshatch pattern for even distribution.
Use a Dual-Action Polisher:
For best results, use a dual-action polisher set to a medium speed. The machine helps work the compound into the paint, breaking down oxidation and eliminating swirl marks.
If you don’t have a machine, use your microfiber applicator pad and apply firm, overlapping strokes.
Buff the Surface:
Once the compound has been thoroughly worked in, use a clean microfiber towel to buff away any residue. The paint should begin to shine and appear more uniform.
Repeat the polishing process if necessary, particularly on areas with stubborn swirl marks.
Step 4: Application of Protective Coating
Select Your Protective Product:
Choose a premium wax, sealant, or ceramic coating that offers long-term protection for your paint. These products not only enhance shine but also provide a barrier against UV rays and contaminants.
Apply Evenly:
Use a foam or microfiber applicator pad to apply the protective coating in thin, even layers. Work methodically across the entire surface to avoid missing any spots.
Follow the product’s instructions regarding flash time and drying period.
Allow to Cure:
Let the protective coating cure in a dust-free, shaded area as per the manufacturer’s recommendations. This step is critical to ensure that the product bonds properly to the paint.
Final Buffing:
Once the coating has cured, use a clean microfiber cloth to gently buff the surface. This step enhances the final gloss and ensures a streak-free finish.
Expert Tip: “Patience is key during the polishing and protective coating steps. Rushing can result in uneven finishes or reduced durability, so take your time to ensure each layer is applied perfectly.”
Preventing Future Swirl Marks

Once you’ve achieved a flawless finish, the next step is to maintain your vehicle’s pristine appearance. Preventing future swirl marks involves adopting a proactive cleaning and maintenance routine.
Daily Care and Maintenance
Proper Washing Techniques:
Always wash your car using a pH-balanced, microfiber mitt. Avoid using sponges or rough cloths that can create additional micro-scratches.
Use a two-bucket method—one for washing and one for rinsing—to minimize the chance of reintroducing dirt onto the paint.
Gentle Drying:
Dry your car immediately after washing using a clean, high-quality microfiber towel or a dedicated drying aid. Avoid air drying, as water droplets can leave behind mineral deposits that contribute to swirl marks.
Regular Waxing:
Apply a high-quality wax or sealant regularly to protect the paint and minimize the risk of swirl marks. A protective layer makes it easier to clean the car without causing additional damage.
Routine Inspections and Touch-Ups
Frequent Inspections:
Regularly inspect your car’s paint under bright lighting to catch any early signs of swirl marks or oxidation.
Address minor imperfections promptly with a quick polishing or touch-up treatment.
Professional Maintenance:
Consider scheduling professional detailing services at least once or twice a year. Professional detailers have the tools and expertise to remove swirl marks more effectively than DIY methods alone.
Best Practices for Swirl Mark Prevention
Avoid Harsh Chemicals:
Use only products that are designed for automotive use and are gentle on your paint.Mind the Drying Process:
Never let your car air dry after washing; always use a microfiber towel to dry it completely.Educate Yourself:
Stay informed about the latest best practices and products for car paint maintenance. Regularly reading expert guides and reviews can help you keep up with new techniques and technologies.
Expert Tip: “Incorporating regular maintenance into your routine is the most effective way to prevent swirl marks. Small, consistent steps can save you from costly repairs and preserve your car’s appearance.”
Frequently Asked Questions (FAQ)
Q1: What causes swirl marks on car paint?
A: Swirl marks are caused by micro-scratches on your car’s clear coat, often resulting from improper washing techniques, using dirty or abrasive microfiber towels, or automated car washes with harsh brushes.
Q2: Can I remove swirl marks without professional tools?
A: Yes, DIY methods such as using quality polishing compounds, microfiber applicator pads, and dual-action polishers can effectively remove swirl marks. However, professional-grade tools generally yield more consistent and lasting results.
Q3: What is the best compound for removing swirl marks?
A: High-quality restoration compounds specifically formulated for swirl mark removal are recommended. Look for products with strong reviews from professional detailers. Always follow the manufacturer’s instructions for optimal results.
Q4: How often should I have my car detailed to avoid swirl marks?
A: Regular maintenance is key. It is generally recommended to detail your car every 3 to 6 months to prevent the buildup of contaminants that can lead to swirl marks.
Q5: Can dual-action polishers remove swirl marks effectively?
A: Yes, dual-action polishers are highly effective for removing swirl marks when used correctly. They provide controlled, even polishing that minimizes the risk of additional damage.
Q6: What are the common mistakes to avoid during swirl mark removal?
A: Common pitfalls include:
Rushing the process and not preparing the surface properly.
Over-sanding, which can damage the clear coat.
Over-applying polishing compound, leading to uneven results.
Failing to use clean, high-quality microfiber towels for drying and buffing.
Q7: Is it possible to prevent swirl marks from forming?
A: Absolutely. Preventative measures include using proper washing techniques, drying your car thoroughly, regular waxing, and using high-quality, non-abrasive cleaning products. Educating yourself on proper maintenance practices is key.
Q8: How do professional detailers handle swirl mark removal?
A: Professional detailers use a combination of precise washing, decontamination, multi-stage sanding, and careful polishing with premium compounds and dual-action polishers. They also apply protective coatings to prevent future swirl marks.
Q9: Are there any eco-friendly solutions for swirl mark removal?
A: Yes, many modern detailing products are formulated to be eco-friendly while still delivering professional-grade performance. Look for biodegradable, pH-balanced compounds that are gentle on your car’s paint and the environment.
Q10: Can I perform a quick touch-up at home if I notice new swirl marks?
A: Yes, minor swirl marks can be addressed with a quick touch-up using a dedicated swirl mark removal compound and a microfiber applicator. For more severe issues, a full detailing session is recommended.
Conclusion and Final Recommendations
Swirl marks can significantly diminish the beauty and value of your car’s paint, but with the right approach, they can be effectively removed. In this definitive guide on how to remove swirl marks from your car, we’ve covered everything from understanding the causes and science behind swirl marks to providing a step-by-step process for their removal.
Whether you opt for DIY methods or choose professional techniques, the key to success lies in meticulous preparation, the use of high-quality products and tools, and consistent maintenance.
Key Takeaways:
Understanding Swirl Marks: Recognizing the causes helps in selecting the right removal method.
Essential Tools & Products: Investing in professional-grade tools like dual-action polishers, premium restoration compounds, and high-quality microfiber towels is crucial.
Step-by-Step Process: Following a systematic approach—from thorough cleaning and decontamination to multi-stage sanding, polishing, and protective coating—ensures a flawless finish.
Prevention is Critical: Regular maintenance and proper washing techniques are the best ways to prevent swirl marks from reappearing.
DIY vs. Professional: While many DIY methods yield great results, professional detailers can provide a more consistent and long-lasting finish.
By following the expert tips and detailed instructions in this guide, you can restore your car’s paint to its original brilliance and maintain a flawless finish that not only enhances your car’s appearance but also its resale value.
Final Recommendation:
For optimal results, consider combining regular DIY maintenance with periodic professional detailing sessions. Whether you’re a car enthusiast looking to perfect your DIY routine or a professional seeking to refine your techniques, our comprehensive guide provides the insights you need.
Ready to restore your car’s shine and protect its finish?
Explore our range of high-quality detailing products or contact us at Fresh Layer Mobile Detailing for professional car detailing services. Experience the difference that expert care can make in transforming your vehicle’s appearance and preserving its value.